A few people would state that circular saws are not for weenies, but first, they would not be right. It doesn't make a difference where you rank on the boldness scale; on the off chance that you have an atom of want to construct stuff you can figure out how to deal with this apparatus with the unflagging expert of a bra sales representative.
You'll cherish the flexibility your saw offers you to cook up ventures. Regardless of whether you need to assemble an instrument shed, a night table, a deck, a sandbox, a raised outskirt or a garden seat, your circular saw will be your most loved associate.
The main thing it can't do is bring lager.
Putting off figuring out how to use your circular saw will just shield you from communicating the full scope of your inattentiveness so here's a fast in and out instructional exercise on the highlights of your circular saw...
Inspect your saw. A corded circular saw has more power than most batteries worked models. Other than that every single circular saw play out the same great capacity. They cut wood in decent straight lines with least exertion, and they do it speedier than stink. Also, current circular saws have cutting edge watchmen and electric brakes to limit the threat to your body parts.
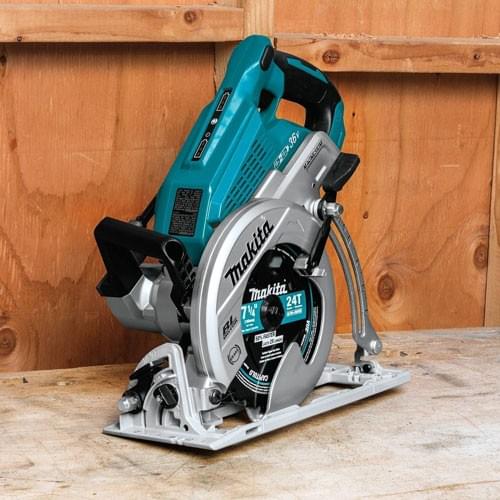
The edge juts out of a level metal soleplate. You can modify the soleplate to uncover pretty much of the sharp edge. This is an energizing component. Why? Since the soleplate change enables you to make profound slices through the thick wood, or shallow slices through more slender material like plywood.
Extricate the wing-nut (generally at the back of the engine) to slide the soleplate here and there, uncovering pretty much of the edge. At that point re-fix the wing-nut. The soleplate alteration can be sticky, particularly on the off chance that it hasn't regularly been handled.
The vast majority don't try changing their soleplate, ever. In any case, here's the reason you'd need to. The cutting edge can tie in your workpiece if you have excessively sharp edge uncovered. Now and then the saw jolts in reverse toward you like Killdozer.
This is called 'kickback'. Kickback sucks. So limit your odds of kickback by setting your sharp edge one-fourth of an inch further than the thickness of the wood you're cutting, and never compel the edge forward if it's authoritative. End of address. For the present.
Another modification that will spellbind you is the slope change. It enables your saw to make slices on any edge up to around 50 degrees. For what reason would you need this? You may need to miter the blades of your sandbox or angle the blade of a seat, or you may need to frank with a little crown-forming.
To change the incline, find another wing-nut, ordinarily before the engine. It's tucked away in a little protractor gathering. Slacken the wing-nut and push on the edge of the sole plate to tilt the cutting edge. Gracious infant.
Numerous saws accompany a tearing aide, a metal t-formed bar that you attach to the sole plate with another convenient wing-nut. The tearing aide keeps running against the edge of the wood you're dealing with and keeps your cut wonderfully square.
On the off chance that saw didn't accompany a tearing aide you can arrange one from the producer or assemble a family conference and state solidly that the nature of everybody's lives would enhance on the off chance that you had a hearing aid.
Give your saw the spa treatment by introducing an Irwin Marathon cutting edge ($10), the quickest, most straightforward dang surrounding sharp edge you'll ever work with. It has exceptional vents to cool the sharp side as you're cutting, so the edge won't twist.
When you're changing the cutting edge, here's a tip – if the razor is housed in the left half of your saw (as imagined right), the threading is turned around. To extricate the jolt you need to set it clockwise, not counter-clockwise. The purpose of the turned around threading is that once you've fixed the new cutting edge into position, each time you utilize the sharp edge it fixes itself as it cuts, so the edge can never go taking off. Don't you feel better realizing that?
On the off chance that I've confounded you, simply know this: No issue which side your edge is on, you'll be slackening the sharp edge toward turn, and fixing it the other way.